
 admin
admin
CyberPanel is a powerful, open-source web hosting control panel that simplifies server management, featuring OpenLiteSpeed, a high-performance web server. As of 2024, CyberPanel continues to evolve with new features, performance improvements, and security enhancements. This tutorial will guide you through the installation process of the latest CyberPanel version on a fresh CentOS or Ubuntu server.
1. Prerequisites
Before you begin the installation, ensure that your server meets the following requirements:
- Operating System: CentOS 7/8, Ubuntu 18.04, Ubuntu 20.04, AlmaLinux 8, AlmaLinux 9, Ubuntu 22.04, CloudLinux 8
- Memory: Minimum 1 GB of RAM (2 GB recommended).
- Storage: At least 10 GB of free disk space.
- Processor: 1 CPU Core or higher.
Additionally, you should have root access to the server or a user with sudo privileges.
2. Update Your Server
Before installing CyberPanel, it’s important to update your server to ensure all packages are up-to-date.
For CentOS:
sudo yum update -yFor Ubuntu:
sudo apt-get update && sudo apt-get upgrade -y3. Install CyberPanel
CyberPanel provides an easy-to-use installation script. To download and start the installation, use the following commands:
For both CentOS and Ubuntu:
sh <(curl https://cyberpanel.net/install.sh || wget -O - https://cyberpanel.net/install.sh)The script will prompt you with several options during the installation process:
- Install CyberPanel with OpenLiteSpeed or LiteSpeed Enterprise: Choose the appropriate option. OpenLiteSpeed is free and sufficient for most users, while LiteSpeed Enterprise offers additional features and is better suited for high-traffic websites.
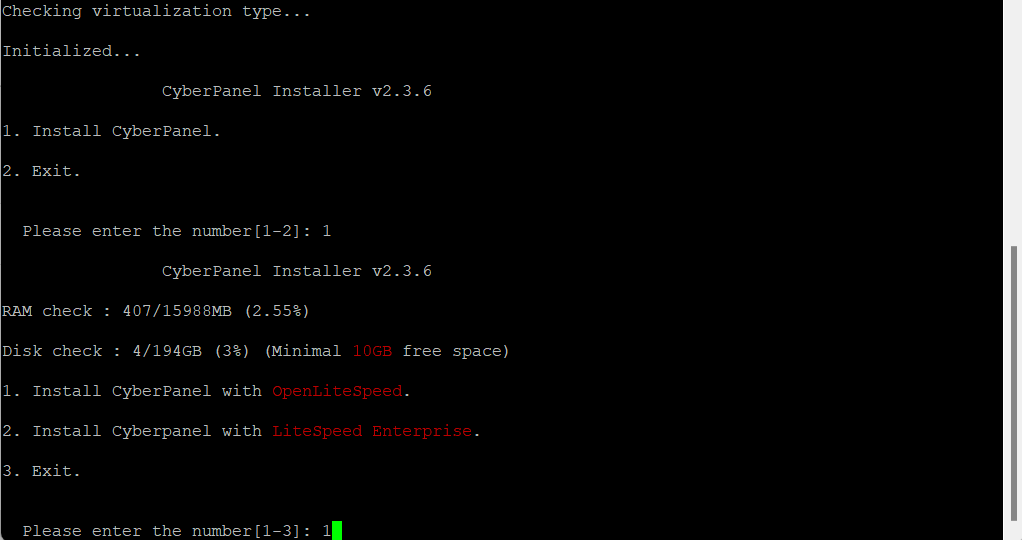
You can select [1] cyberpanel with OpenLiteSpeed. If you select Litespeed Enterprise, Please first ensure that you have got the license key. You can visit the Pricing page cyberpanel to get the required plan.
- Full Installation or Minimal Installation: Opt for full installation to include all features, such as Mail Server, FTP, and DNS.
You will encounter a sequence of prompts offering various options and add-ons for selection.
– Full Service (default Y):
PowerDNS – an open-source DNS server
Postfix – open-source mail transfer agent
Pure-FTPd – open-source FTP server

– Remote MySQL (default N):
Allow for your Database to be installed on a remote server

– CyberPanel Version (default Latest Version):
You can choose to install a previous version of CyberPanel, or press Enter to install the latest version.

– Password (default “1234567”):
Using the default password is not advisable. It is recommended to set a strong password of your own by choosing ‘s’ or generate a random password by selecting ‘r’. After the installation, you will see the password prompt displayed on the screen.

– Memcached (default Y):
Distributed memory object caching system
– Redis (default Y):
In-memory data structure store, used as a database, cache, and message broke
– Watchdog (default Yes):
A kernel watchdog is used to monitor if a system is running. It is supposed to automatically reboot hanged systems due to unrecoverable software errors
- Installation Processing
The installation process will initiate automatically and is expected to be complete within 5-15 minutes, depending on your server’s speed.
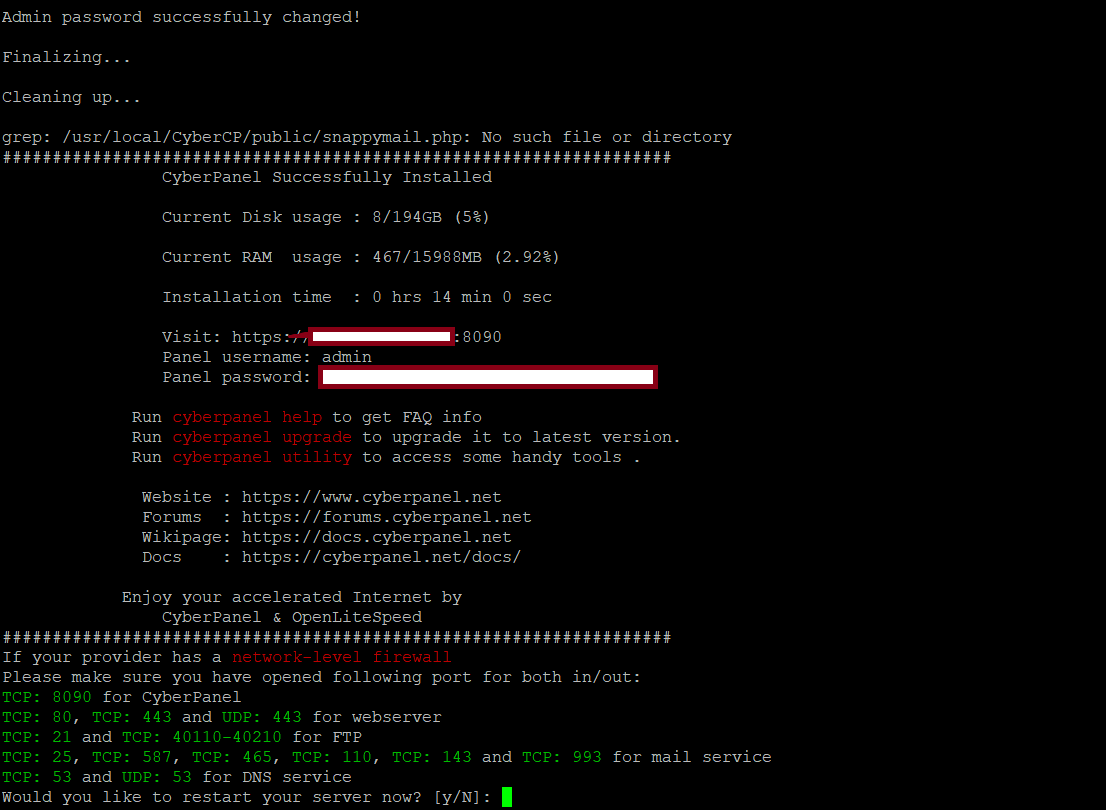
- Finalize Installation
Upon completion of the installation process, you will encounter a screen displaying important information regarding your configuration. It is recommended to select and securely copy this information to a safe location for future reference.
4. Accessing CyberPanel
After the installation is complete, you can access the CyberPanel dashboard using your web browser.
- Open your browser and navigate to:
https://<your-server-ip>:8090 - Login with the credentials set during the installation (default username:
admin).
If you face any SSL warnings, you can safely proceed by adding an exception or by installing a valid SSL certificate later.
5. Post-Installation Configuration
Once you’ve logged in, you can start configuring your CyberPanel:
- Update System: Navigate to the "Updates" section to ensure you have the latest patches.
- Set Up Domains: Add domains and manage DNS settings.
- Email Configuration: If you installed the mail server, configure your email settings.
- Install SSL Certificates: Set up SSL certificates to secure your websites.
6. CyberPanel CLI Commands
CyberPanel also provides a command-line interface (CLI) for managing your server. Here are a few essential commands:
Upgrade CyberPanel:
sudo sh <(curl https://cyberpanel.net/upgrade.sh)Restart OpenLiteSpeed:
sudo systemctl restart lswsRestart Cyberpanel:
systemctl restart lscpd7. Conclusion
Congratulations! You have successfully installed the latest version of CyberPanel on your server. CyberPanel’s user-friendly interface and powerful features make it an excellent choice for managing web hosting environments, whether for small personal projects or large-scale enterprise applications. Regularly check for updates and explore the documentation to make the most of CyberPanel’s capabilities.
Popular Posts




Categories
Tags

Comments